Should electronics be repairable?
The question seems to ask for a resounding “of course” in my mind, but today I woke up to the following video by Louis Rossman about the right to repair bill and how legislators are trying to counter trade secret lobbyists. If you care about your right to repair your electronics, either by you or a professional, take some time to hear what Louis has to say as a talented independent electronics repairman:
Rossmann mentions how stupid it would be to not be able to repair your own electronics and share how you did so with the rest of the world as he does with Apple products. That thought resonated with me, specially when I decided to look into my faulty drone as a hobby repair recently.
So if you don’t care much about that bill and you are a tech geek like me, take a look at how I fixed my ~$300 drone by fixing a software glitch in one of its motor’s microcontrollers. Then please, rethink again how that bill would affect us all and raise your voice.
One motor not responding
A couple of years ago I was showing my drone to a friend when it started to wobble mid-air and crashed. I could not get to fly it again, nothing seemed wrong with the motors or anything. When re-connecting the battery, all propellers twitched (initialization sequence) except one:
How annoying is that? Everything seems to work except one (upon visual inspection) undamaged motor? Why?
Connecting to the drone (via telnet) and seeing the logs:
0.970751 NULL          6 909390645 BLC call for motor 1
1.970768 NULL          6 909390645 BLC motor 1 flash & start FAILED
2.030722 NULL          6 909390645 BLC call for motor 2
2.142945 NULL          6 909390645 BLC motor 2 soft version 1.43, hard version 3.0, supplier 1.1, lot number 11/10, FVT1 17/11/10
2.200720 NULL          6 909390645 BLC call for motor 3
2.312925 NULL          6 909390645 BLC motor 3 soft version 1.43, hard version 3.0, supplier 1.1, lot number 11/10, FVT1 17/11/10
2.370718 NULL          6 909390645 BLC call for motor 4
2.482919 NULL          6 909390645 BLC motor 4 soft version 1.43, hard version 3.0, supplier 1.1, lot number 11/10, FVT1 17/11/10
2.510740 NULL          6    0 BLC motor 1 dead
2.510942 NULL          6    0 BLC reflash required, perform off/on cycle
(...)
1.005742 NULL          6 909260344 BLC call for motor 1
1.026300 NULL          6 -1096575148 BLC start flash
1.816389 NULL          6 -1096575148 BLC flash done
1.816557 NULL          6   -1 BLC verify
1.835135 NULL          6   -1 BLC verify FAILED - page 0
(...)
!!! Emergency landing from /home/aferran/[...]/version/[...]/Soft/Build/../../Soft/Toy//Os/elinux/Control/motors.c:1593. Reason is Motors have not been initialized correctly
I performed the off/on cycle by reconnecting the battery several times, no luck. Reflash required… but how? There are no instructions for doing that reflash, just power off/on cycle which clearly does not work in my case.
At this point, all the manufacturer tells you is to buy a completely new motor, worth almost $50 plus shipping:

But I insist, nothing seems wrong with the motor itself, neither the few DMC3021LSD MOSFETs that are around the motor board, so it clearly seems like a software issue… with the Atmega8A microcontroller present in each of the 4 motor boards… the microcontroller datasheet states that they should work for 20 years and withstand 100.000 programming cycles. I definitely did not use it neither for that long nor that many times, so it got me curious: what if I could just fix it myself while I still have the right to?
Not bothering opening my drone
So at this point, many people would either buy that motor or throw that dead toy to a pile of e-waste.
Not me.
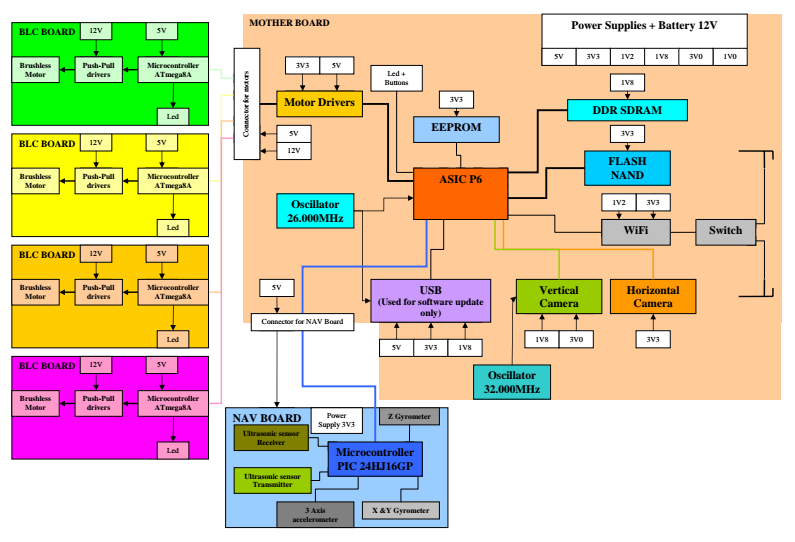
First, before reaching to the screwdriver, let’s learn a bit about how that gadget is built by not opening it until it’s necessary via FCCID.io. There’s a great block diagram which details all its ins an outs:

Also external and internal photos on how the different boards and components look like.
At this point, the BLC board is the one I took a look at… also, for higher quality photos there’s ifixit which regularly tears down gadgets so you don’t have to.
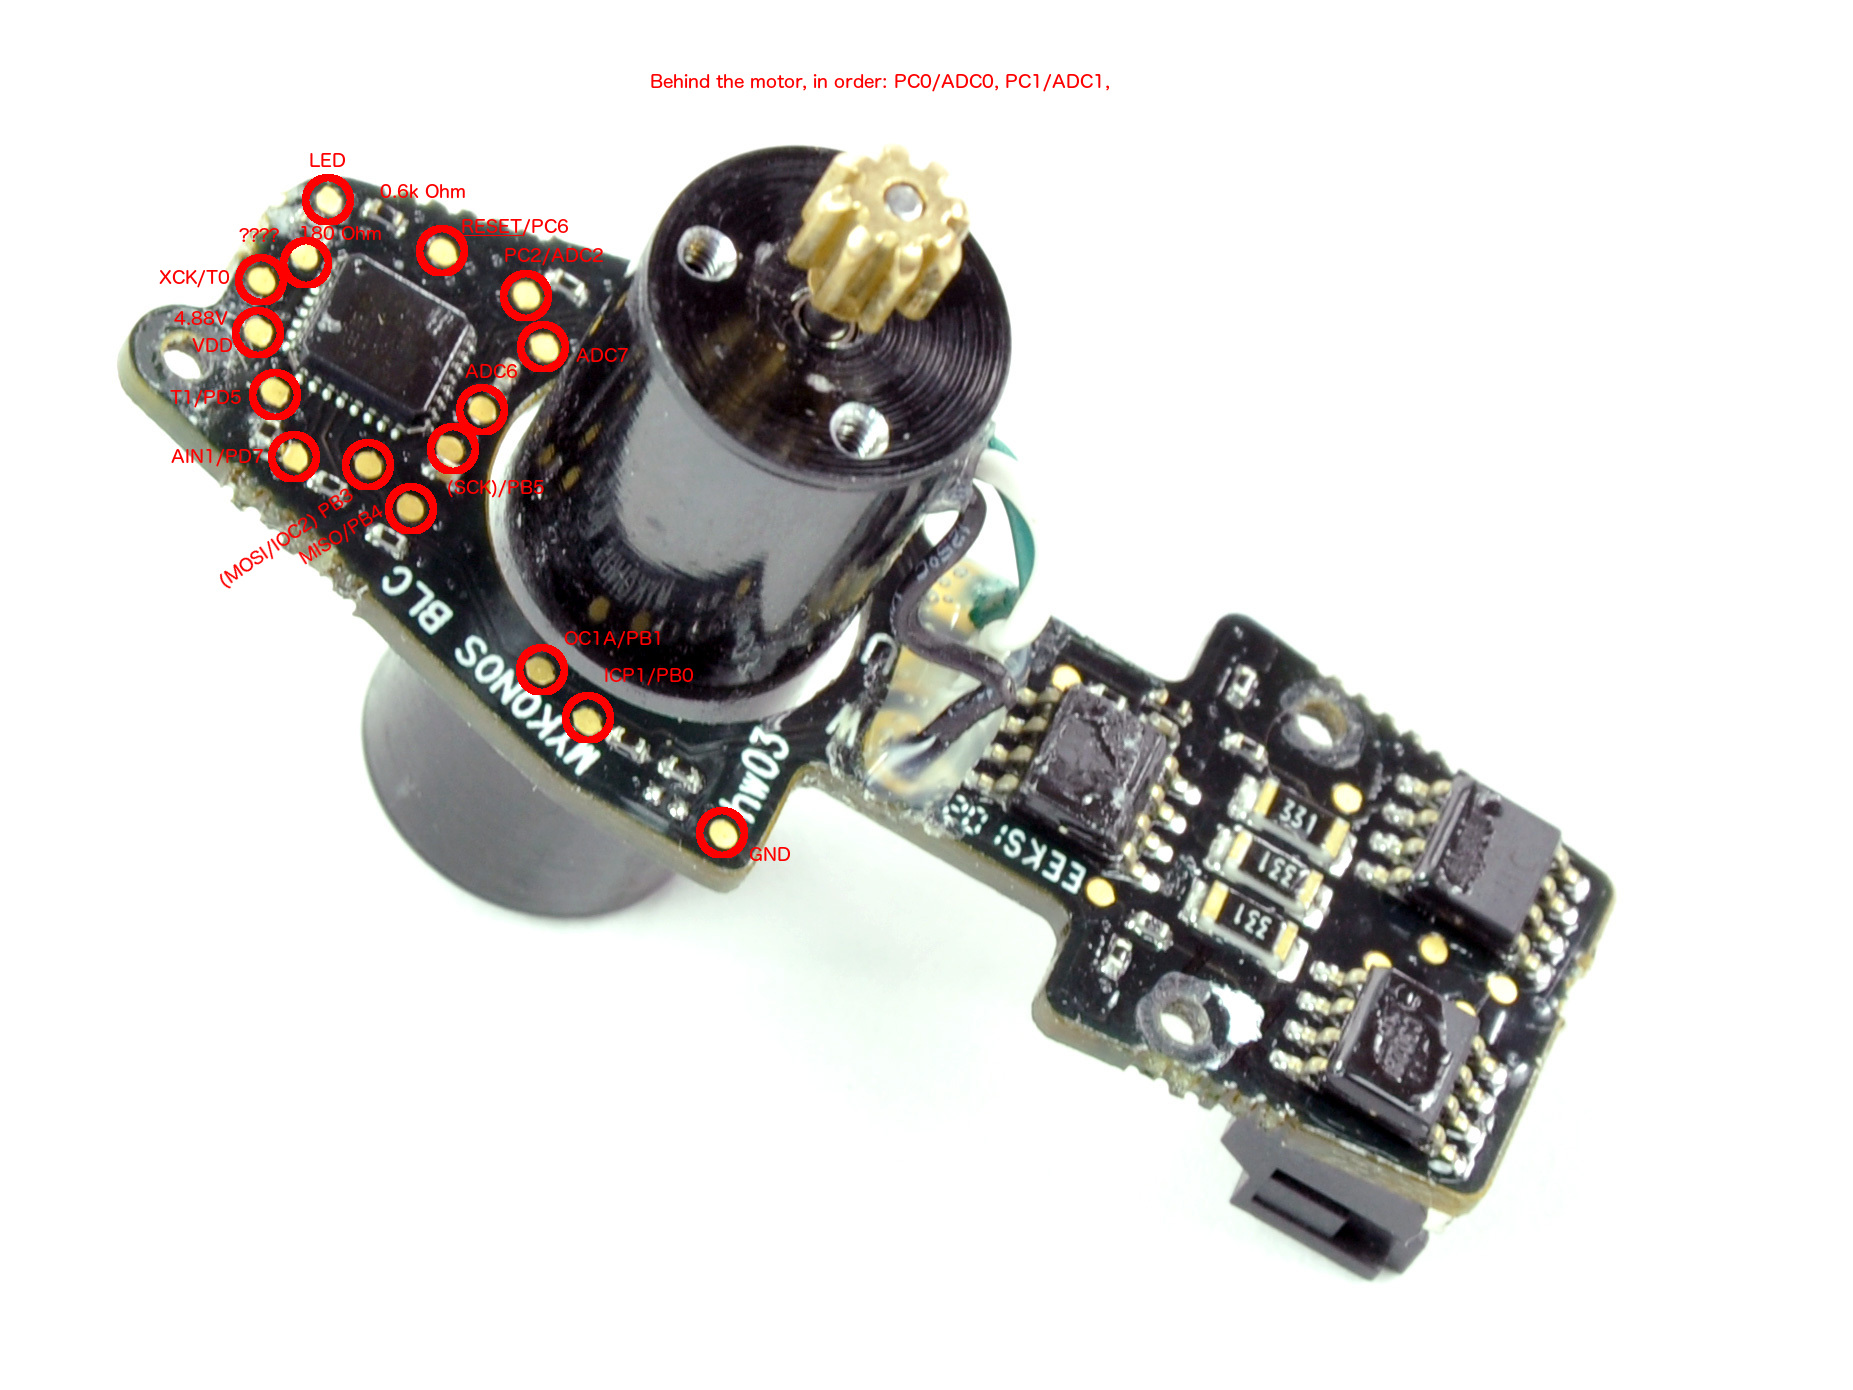
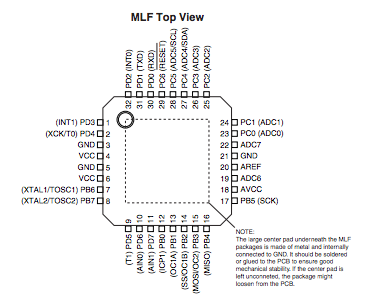
With a multimeter, the Atmega8A datasheet and GIMP it is straightforward to map out the pins from the microcontroller to the board test points:


See those MISO/MOSI/SCK and RESET test points in the motor pinout? Those can be used to communicate with our confused AVR microcontroller.
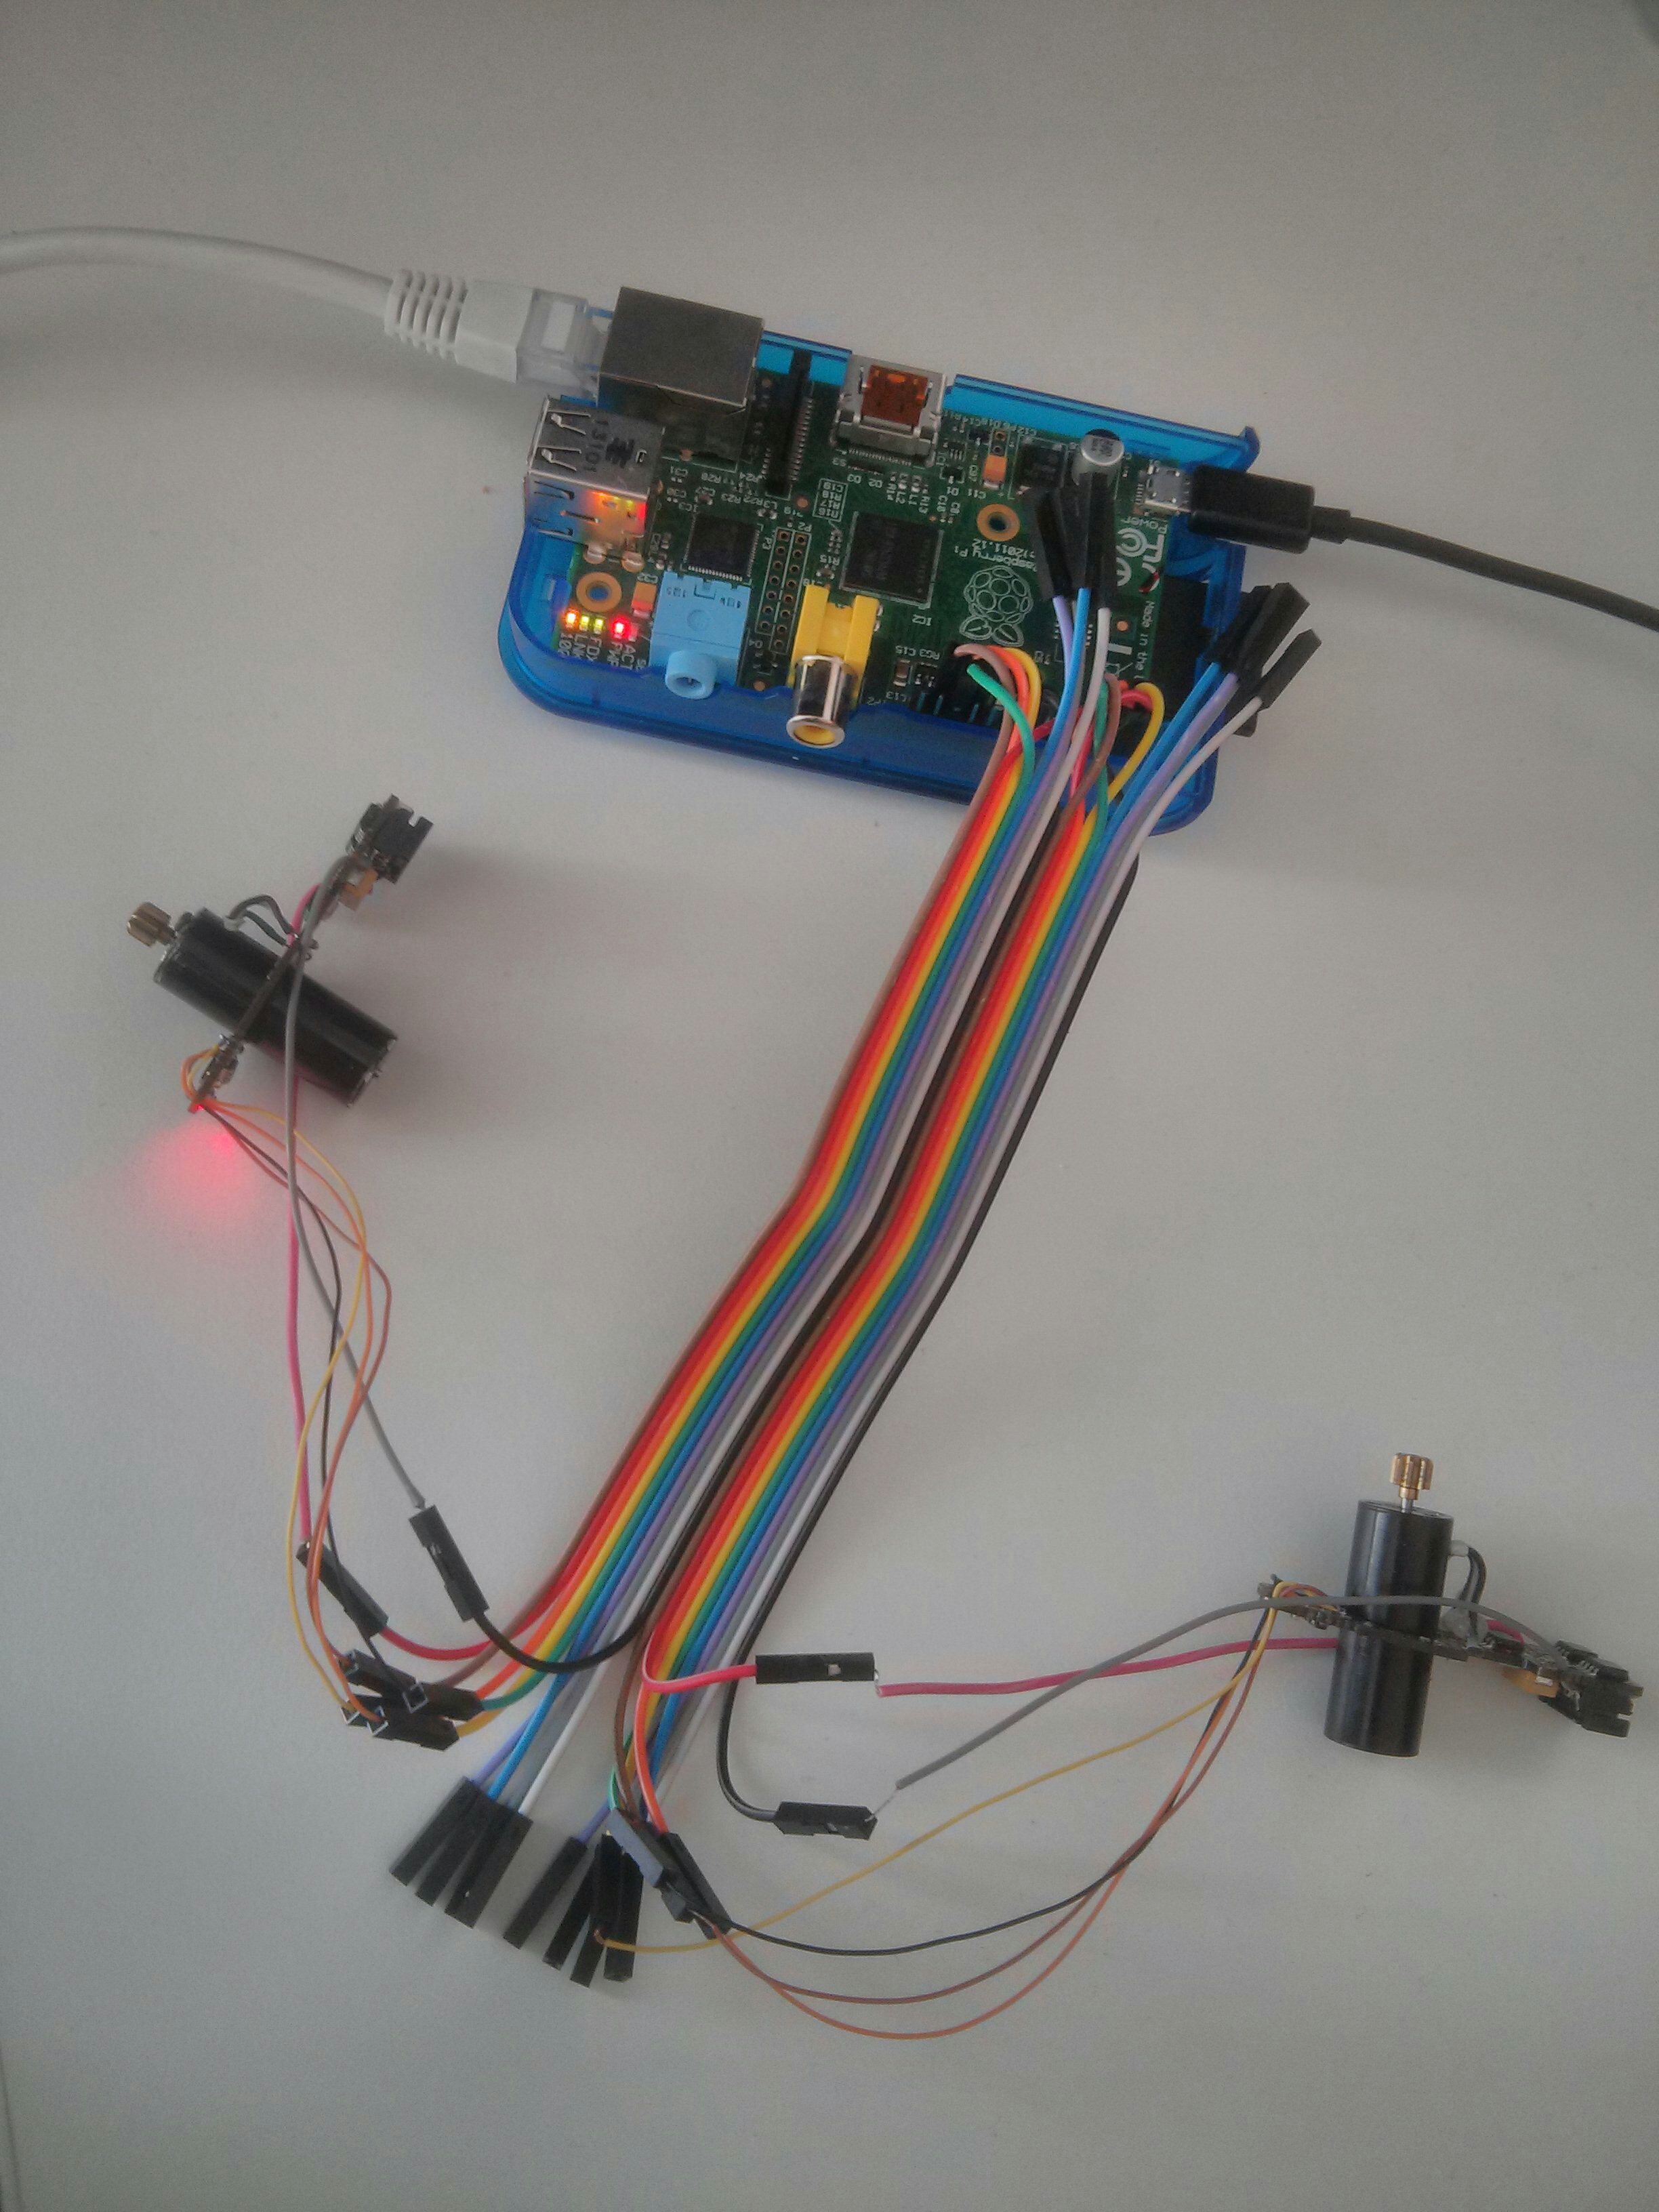
Time for some wiring up a couple of motors with a Raspberry PI
Using a Raspberry Pi one’s GPIO pins acting as a microcontroller’s programmer and AVRdude running on it (just a plain apt-get install avrdude away on a recent raspbian), we can read and write the contents of the faulty motor board:

The pinouts in AVRdude must be defined in their physical mapping. There are tons of diagrams available online on how those are distributed in the different raspberry pi versions, so pick and choose your favorite rpi GPIO pins and tell AVRdude accordingly via /etc/avrdude.conf:
programmer
  id    = "motor_1";
  desc  = "Use the Linux sysfs interface to bitbang GPIO lines";
  type  = "linuxgpio";
  reset = 25;
  sck   = 11;
  mosi  = 10;
  miso  = 9;
;
programmer
  id    = "motor_2";
  desc  = "Use the Linux sysfs interface to bitbang GPIO lines";
  type  = "linuxgpio";
  reset = 14;
  sck   = 4;
  mosi  = 3;
  miso  = 2;
;
If all goes well and it’s properly wired, you should get this from avrdude:
$ avrdude -p m8 -C /etc/avrdude.conf -c motor_2 -v (…) avrdude: AVR device initialized and ready to accept instructions
Reading | ################################################## | 100% 0.00s
avrdude: Device signature = 0x1e9307 (probably m8) avrdude: safemode: hfuse reads as DC
avrdude: safemode: hfuse reads as DC avrdude: safemode: Fuses OK (E:FF, H:DC, L:E4)
avrdude done. Thank you.
Then it’s just a matter of running avrdude to read the contents of the flash, eeprom, fuse and lock bits:
# avrdude -p m8 -C /etc/avrdude.conf -c ardrone_motor_2 -U flash:r:flash.hex:i -U eeprom:r:eeprom.hex:i
# avrdude -p m8 -C /etc/avrdude.conf -c ardrone_motor_2 -U lock:r:lock.hex:i -U hfuse:r:hfuse.hex:i -U lfuse:lfuse.hex:i
How can we tell the dead from the living? Using UNIX diff.
Diffing the motor’s bits
Why did I connect two motors, that is one healthy and one “dead”, instead of just the faulty one?
As I learned from bioinformatics, comparing NORMAL vs TUMOUR tissue can reveal useful insights about biology. After this really stretched yet handy analogy which I probably should be embarassed about, let’s see what I found:
$ diff -u motor1/eeprom.hex motor2/eeprom.hex
--- motor2/eeprom.hex     2016-06-06 08:47:26.815120557 +0000
+++ motor1/eeprom.hex     2016-06-06 09:35:17.664976258 +0000
@@ -1,4 +1,4 @@
-:20000000AC8A0001018A0A110BFFFFFFFFFFFFFFFFFFFFFFFFFFFFFFFFFFFFFFFFFFFFFF0F
+:20000000FF030001010B0A120B0AFFFFFFFFFFFFFFFFFFFFFFFFFFFFFFFFFFFFFFFFFFFFB6
 :20002000FFFFFFFFFFFFFFFFFFFFFFFFFFFFFFFFFFFFFFFFFFFFFFFFFFFFFFFFFFFFFFFFE0
 :20004000FFFFFFFFFFFFFFFFFFFFFFFFFFFFFFFFFFFFFFFFFFFFFFFFFFFFFFFFFFFFFFFFC0
 :20006000FFFFFFFFFFFFFFFFFFFFFFFFFFFFFFFFFFFFFFFFFFFFFFFFFFFFFFFFFFFFFFFFA0

diff -u motor1/lock.hex motor2/lock.hex
--- motor1/lock.hex     2016-06-06 10:00:38.532028704 +0000
+++ motor2/lock.hex     2016-06-06 09:09:24.738241220 +0000
@@ -1,2 +1,2 @@
-:0100000003FC
+:010000002FD0
 :00000001FF
So the EEPROM holds information that I have no time to reverse engineer now (motor coil timing calibration? total flight hours?… no clue).
On the other hand, the lock bits got me interested. As Alexander and Boris say in their AVR workshops: “when in doubt, look at the datasheet!”.
So the datasheet states the following about lock bits near table 86 on page 215:
The ATmega8 provides six Lock Bits which can be left unprogrammed (“1”) or can be programmed (“0”) to obtain the additional features listed in Table 86. The Lock Bits can only be erased to “1” with the Chip Erase command.
Alright, so what if we just erase the chip with avrdude’s -e command?
avrdude -p m8 -C /etc/avrdude.conf -c motor_1 -e
And then reflash the flash back?:
avrdude -p m8 -C /etc/avrdude.conf -c motor_1 -U flash:w:flash.hex:i
To be fair, those locks might be enforced when the firmware detects that there’s a serious mechanical issue with the rotor, which defaults to cutout/shutdown if there’s something wrong with it, preventing worse damage involving burned MOSFETs, destroyed motor coils, etc…
But since there are no further specs nor documentation from the manufacturer about this topic other than "Motors have not been initialized correctly"… how should I know if I want to?
In any case, that’s it, I just saved the environment and $50 by unlocking an incorrectly software-locked hardware!
There are a few bits missing on how I debugged this issue and saved some followup reverse engineering work Hugo Perquin did on his blog. About reverse engineering, I might present some work at the first Radare2 conference.
But anyways, I hope to have raised some awareness about the right to repair while entertaining some nerds like me ;)
