Here’s an update on part 1 for the repair work of my (broken) spectrum analyzer. Great progress and development happened on the software side, unfortunate issues on the hardware side (if you stick up until the end).
I must stress that the final goal of this exercise is to have a working test instrument. I am personally not interested in bypassing security restrictions as long as they don’t interfere with the repair process (a.k.a: fair use).
In other words, this is my personal electronics repair hobby project and also my minuscule contribution to keep great hardware away from the landfill… unlike, say, Sonos.
Unpacking the firmware
The firmware updates are kindly distributed online by Anritsu here. Also having radare2 makes it easy to not needing windows to cut to the chase (the .CAB file):
As I was writing this, someone fixed pmj making future scripting and automation of the pm subcommand easier… did I mention r2 community is awesome?
So extracting the cab contents, including firmware and modules is straightforward now with cabextract command line tool:
Hunting VxWorks symbols with VxHunter
After dabbling a bit with RAM dumps (as mentioned in part 1) and roughly delimiting the sections, I started reading some literature on VxWorks RTOS. Two VxWorks experts emerged on my searches: Wenzhe Zhu and Yannick Formaggio. Since Wenzhe has a VxHunter tool I could poke around with, I ran his software and filed an issue on Github with my results. His tool can be potentially integrated with either Binwalk or binaryanalysis-ng to (semi?-)automatically assist future analysis of VxWorks firmware, but I digress.
VxHunter for r2
After some discussions, testing and fixing, I introduced Whenze to radare2 and he ported vxHunter there. I could now reliably see all the symbols of the instrument’s boot sequence in front of me, the joy :D
VxHunter support Radare2 now, it work with both firmware file and memory dump file.
— dark_lbp (@dark_lbp) October 9, 2019
Thanks to @braincode and Radare community for helping me write this script. #radare2 #vxhunterhttps://t.co/rJbob3PKXG pic.twitter.com/hpQybZldmb
Here’s a typical VxHunter session after cloning vxhunter:
From boot to app code
Here’s what the instrument sequence looks like in a nutshell after the symbols have been demangled by VxHunter. The standard user level entry point function in VxWorks is _usrInit, which looks like this in our firmware:
void _usrInit(undefined4 param_1)
{
  (*(code *)PTR__sysStart_0c0878fc)(param_1);
  (*(code *)PTR__cacheLibInit_0c087900)(1,(int)DAT_0c0878fa);
  (*(code *)PTR__excVecInit_0c087904)();
  (*(code *)PTR__sysHwInit_0c087908)();
  (*(code *)PTR__usrCacheEnable_0c08790c)();
  (*(code *)PTR__wvLibInit_0c087910)();
  (*(code *)PTR__usrKernelInit_0c087914)();
  return;
}
For embedded OS developers, the first 6 function calls should be familiar: exception vector init, cache init, etc. The last one, _usrKernelInit eventually calls _usrRoot, getting closer to the application level:
void _usrRoot(undefined4 param_1,undefined4 param_2)

{
  (*(code *)PTR__usrKernelCoreInit_0c088404)();
  (*(code *)PTR__memInit_0c088408)(param_1,param_2);
  (*(code *)PTR__memPartLibInit_0c08840c)(param_1,param_2);
  (*(code *)PTR__usbdPciInit_0c088410)();
  (*(code *)PTR__usrUsbTargPciInit_0c088414)();
  (*(code *)PTR__sysClkInit_0c088418)();
  (*(code *)PTR__selectInit_0c08841c)(100);
  (*(code *)PTR__usrIosCoreInit_0c088420)();
  (*(code *)PTR__usrKernelExtraInit_0c088424)();
  (*(code *)PTR__usrIosExtraInit_0c088428)();
  (*(code *)PTR__usrNetworkInit_0c08842c)();
  (*(code *)PTR__selTaskDeleteHookAdd_0c088430)();
  (*(code *)PTR__usbInit_0c088434)();
  (*(code *)PTR__usrUsbHcdOhciAttach_0c088438)();
  (*(code *)PTR__usrUsbMseInit_0c08843c)();
  (*(code *)PTR__usrUsbKbdInit_0c088440)();
  (*(code *)PTR__usrUsbBulkDevInit_0c088444)();
  (*(code *)PTR__usrUsbCbiUfiDevInit_0c088448)();
  (*(code *)PTR__usrToolsInit_0c08844c)();
  (*(code *)PTR__cplusCtorsLink_0c088450)();
  (*(code *)PTR__usrCplusLibInit_0c088454)();
  (*(code *)PTR__cplusDemanglerInit_0c088458)();
  (*(code *)PTR__usrAppInit_0c08845c)();
  return;
}
The last function, usrAppInit is the standard VxWorks entry point/handler for “apps” therefore myAppInit with Anritsu-specific initializations, follows up:
void _usrAppInit(void)

{
  (*(code *)PTR__myAppInit_0c040a1c)();
  return;
}
Which in turn has quite a lot going on:
- Setup block devices.
- Keypad and “twiddle” control.
- Checking battery status and level.
- Checking serial numbers of the board.
- EEPROM status (and recovery).
- Load cst_base.out.
The last object, cst_base.out, is a plain SuperH4 ELF that is easier to examine since it does not have any special VxWorks header or sections. It uses some of the RTOS functions though, so some references will have to be collated with VxWorks.bin. Here’s where the WDB-dumped instrument RAM becomes handy since symbols from VxWorks.bin are resolved/melt with those .out ELF “main app plugins” (also called instrument “options”).
Meanwhile, the boot log when logging early on via telnet to the instrument looks like this:
Integrated debugging support
WDB already, which is what we used to dump the memory contents. Now we have a debugger accessible via telnet.
Which even resolves symbols for us, thanks to the “l” (listing) command, as if we were in gdb’s dissassemble command or objdump-sh4:
Hardware failure setback
Unfortunately there are some electrical issues that showed up during my testing. I suspect that a ~10 year old instrument is just showing its age, but since the processor seems to be alive:
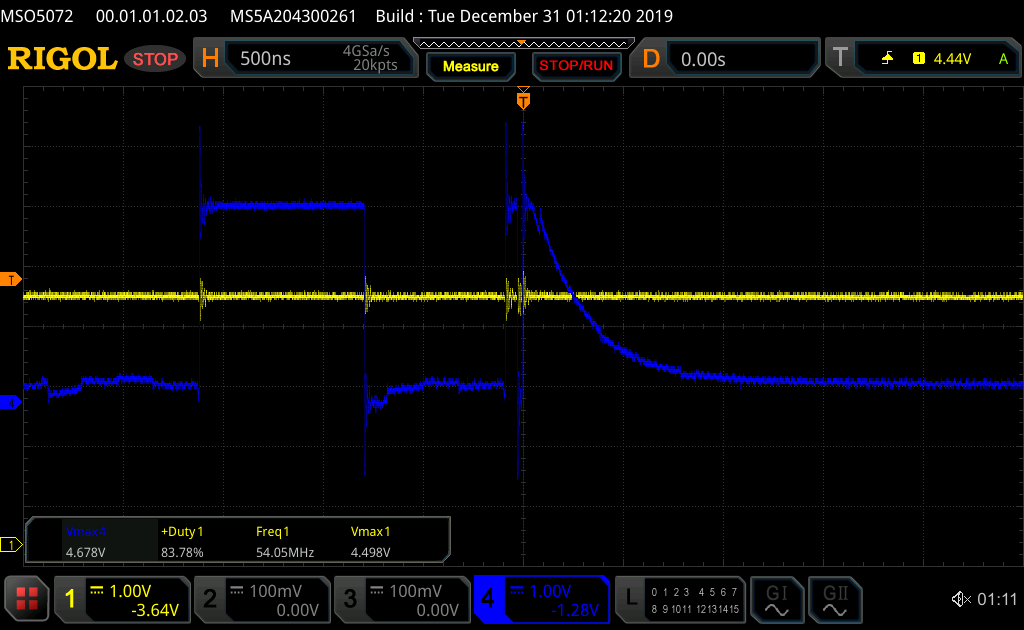
In this oscilloscope capture one of the power rails is being capture as the READY signal oscillates. The processor seems to be alive but there’s some failure with the integrated power supply rail(s).
I’ll be putting my next hobby repair efforts to diagnosing the power rails and substituting some cracked-looking ceramic capacitors, unless some reader has better repair/diagnostic ideas! Please reach out: @braincode or brainstorm at nopcode dot org for any feedback and questions.